Email with a signature looks professional; these signatures work as your digital visiting card. That is why you must have noticed that almost all the professional emails you receive have signatures attached to them. Thus, you should also create a professional email signature to improve your professional presence.
Well, if you are using Gmail for sending emails and wondering how to create professional email signature in Gmail, this article is for you. In this article, I will guide you step by step to create an email signature in Gmail.
You don’t have to design your email signature yourself because many websites allow you to create professional email signatures for your Gmail account. So, don’t worry, if you are not that good at designing, the websites mentioned in this article will help you with that. But, before that let’s check out the steps to add an email signature in Gmail.
There are two simple steps to create a professional email signature in Gmail:
- Design an email signature from a professional email signature generator.
- Add your designed email signature to your Gmail account.
The Best Websites To Design Professional Email Signature
As discussed above, some free online tools allow you to create professional email signatures for your Gmail account. The first step is to design the email signature using any of the websites listed below.
1. Mail Signatures
The first email signature website is mail-signatures.com. It provides you with 40+ email signature templates. With the help of these templates, you can get your email signature from this website. And the best part is it’s a free email signature generator. Moreover, it allows you to create a signature for Microsoft 365, Outlook, Apple Mail, etc.
To design your email signature using this website, first of all, visit the website and click on the Signature Generator category. Inside the free signature generator tool, select Gmail as the email platform from the left bottom corner, and choose the desired template from the right side section.
After that, you just need to fill in the details in the Signature Details section which will also show you the live preview on the right side. After filling in the details, scroll down and tap on the Apply Your Signature button. On the next page, you’ll be able to copy the signature and paste it into your Gmail, which I will guide you how later in this post.

2. HubSpot Email Signature
HubSpot is a famous marketing and sales software provider. Like the last one, it has an email signature generator that allows you to create professional email signatures to add to your Gmail. Alongside, it has various other free and paid features and software services for businesses. Its signature generator has 6 templates, which all are free.
To create your email signature on this website, just go to its signature generator page. You can see four separate tabs in the top-left corner for templates, content, styling, and pictures. So, first of all, select a template that you find perfect according to your needs. Now, in the next tab, fill in the details like name, job title, contact details, etc. The third tab is for styling purposes. In the 4th and last tab, you can insert your profile picture and company logo.
After doing all the customizations, scroll down and tap on the Create Signature button. Now, it will ask you some questions about your company. After providing all the details, click on the Confirm and Submit button. Your email signature will appear there on the screen. Copy the signature and paste it into Gmail while setting the signature on the Gmail.

3. Canva
Canva is one of the best designing tools for creating various designs like Instagram posts, stories, visiting cards, holdings, etc. Gmail signature is one of the designs. It will give you hundreds of templates for the email signatures. Some of these are free and some are paid, which you can use with the Canva Pro.
If you want to create a Gmail signature from Canva, go to the Canva Email Signature page and then start with Create an Email Signature button. You will see a blank page with all the templates on the screen. Select the desired template from the left side of the screen.
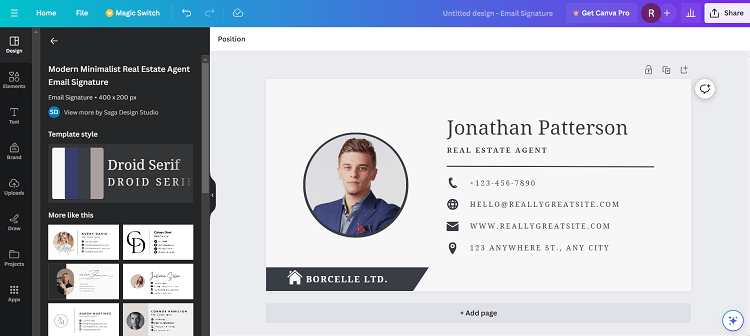
Once you are done with all the customizations, click on the Share button and then click the Download button to download the design. You can later add this design to your Gmail signature section.
4. WiseStamp
The last email signature website is WiseStamp, which is primarily known for creating professional signatures for Gmail. It has 12 templates but not all of them are free. Only the first two templates are free. Its subscription plan will cost only $5 per year.
To create a professional email signature on WiseStamp, go to Wisestamp’s free email signature tool. Here you can fill in all the details like your name, address, email, website, social media profiles, etc. While filling in the details, you can see the real-time preview on the right side.
Click on the OK, I’m Done button after filling in all the details. It will ask you to sign up or log in to proceed further. After following the instructions, the created signature will be set on your Gmail account directly. Unlike the other websites, you don’t need to paste it into Gmail manually.

Add Your Designed Email Signature in Gmail
Many of the users keep hesitating but, in actuality, creating a signature in Gmail is not a tricky thing. It will take a few simple steps. Meanwhile, all those steps are mentioned here you will have to follow to set your signature in Gmail.
- Open the Gmail on your laptop or computer.
- Tap on the Settings button on the top right corner, and then jump to See All Settings.
- Scroll down the General tab on the Settings page to find the Signature section.
- Click on the Create New button to add a new signature to your Gmail account.
- First, you’ll need to enter the signature name in the pop-up box. Enter the one and click on the Create button.
- Now, you will see an empty box just beside your signature name. This is the place where you have to copy and paste your designed email signature using the signature generator websites listed above.
- After adding your designed signature in the field, scroll down the page till the last and click on the Save Changes button to save your signature.

After getting saved, the settings page will close automatically, and you will be in the inbox section. That’s how you can create email signatures in Gmail. Now, with every email that you will send to anyone the signature will be attached automatically.
Read Next: How to Prevent Gmail From Trimming Your Signature
I recommend keeping your Gmail Signature brief and trying to keep the font and style of signature that aligns with your professional image. Also, do not forget to test your signature on multiple big and small devices like mobile phones and laptops to make sure that it appears as intended.

![How to Move Videos to SD Card on Android Phone [Step-by-Step Guide] Move videos to SD card on Android](https://allusefulinfo.com/wp-content/uploads/2023/03/move-videos-to-sd-card-android-thumbnail.jpg)