There are plenty of premium video editing software available in the market but when we talk about free video editing tools Windows Movie Makers is still one of the best choices.
However, it has limited features as compared to a premium video editor, but still the best among free video editors on the web.
Here, in this article, I’m going to guide you on how to overlay a picture to your video clip in Windows Movie Maker. Generally in almost every premium video editor, there is a by-default feature to add picture overlay but Windows Movie Maker lacks such a feature.
But, still by using a trick you will be able to overlay a picture or video to your main video clip without affecting the audio.
Must Read: Best Android Apps For Photography & Videography
How to Add Picture Overlay in Windows Movie Maker
It’s a bit tricky and very simple to do. Here’s how to overlay a picture/video to your main video clip without losing the audio in Windows Movie Maker.
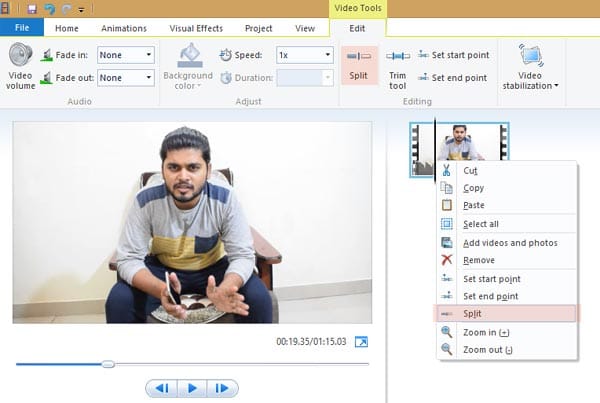
First of all, open the Windows Movie Maker and upload your main video file. After that choose the position in the video where you would like to overlay a photo or video and click on the Split option. You can either find the Split option by right-clicking on the position or simply inside Video Tools.

This Split option will divide the video into two parts from your selected position so that you can easily add the photo or video in between.
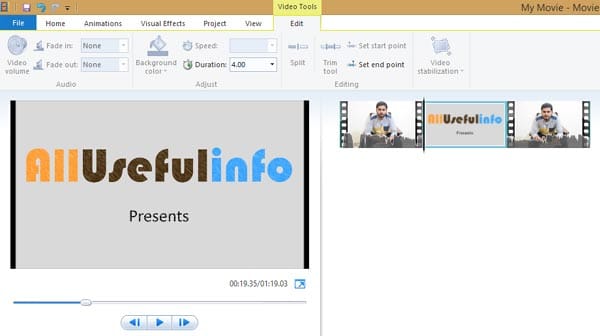
So, now you need to upload the photo or video that you would like to overlay to your main video and move it between the split video clips.

Now, the thing you need to take care of is audio. You need to mute the volume of the whole video and attach the complete audio file externally to the video.
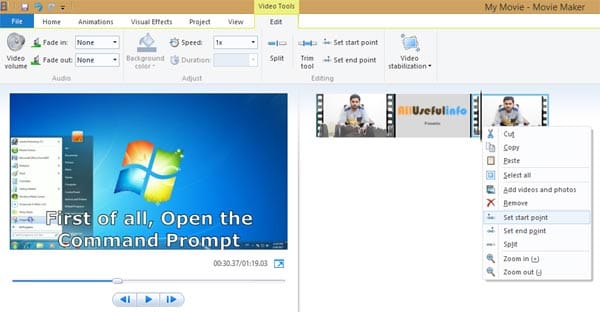
After that, for a better video and audio combination after overlaying a photo/video, you need to change the start time of the video clip next to the photo or video you added to the overlay. For example, if the duration of the overlay picture is 7 seconds, you need to cut the starting 4 seconds of the video clip to perfectly balance the audio and video.
For this just move the video clip 7 seconds (according to the duration of time you chose for the overlay picture), right-click on the clip and click on Set Start Time.

Read Also: Top 5 Free Screen Recording Software For Windows
It’s all. In this way, you can overlay as many photos or videos as you want on your video file in Windows Movie Maker while retaining the audio.
However, it might be a bit time-consuming as compared to other premium software but luckily it works great. You can try it on your computer and let me know if you’re able to do this. Also, feel free to share your feedback via comments.
![10 Best Podcast Recording and Editing Software [2024] 10 best software for podcast recording and editing](https://allusefulinfo.com/wp-content/uploads/2022/02/software-for-podcast-recording-editing.jpg)

![The Best FREE Photo Editing Android Apps [2024] Polish Android App](https://allusefulinfo.com/wp-content/uploads/2020/06/polish-android-app.jpg)

Thank you so much for your help with this issue – has really made my day!
This does not overlay but insert. Two different things.
Very helpful tip for those who are still using Windows Movie Maker for video editing.
Yes, of course those who’re still using Windows Movie Maker might feel difficulty in overlaying photo or video to the main stream. I’m glad you found it helpful.