What can you do when the system crashes and cannot be fixed by usual means? Resetting or reinstalling Windows 10 seems to work, but it may also cause you to lose files, settings, apps, etc.
To rescue a computer without worries, the safer way is to restore the operating system to an earlier state, and this requires a previously created system image. Therefore, it’s better to backup Windows 10 regularly in case of an emergency.
How to Create a System Image in Windows 10?
In Windows 10, you can use File History to auto back personal files to an external drive, or use Backup and Restore to schedule backups for folders and libraries. But to create a system image that can be used for disaster recovery even when the PC fails to start, there’s a specialized System Image Backup feature.
To use it, you need to access Backup settings via Start > Settings > Update & Security, or directly search for “backup settings” on the taskbar. Then click on the “Go to Backup and Restore (Windows 7)” option and take the following steps to proceed:
- Select “Create a System Image” on the top left corner of the popping-out window, you will enter the backup wizard.

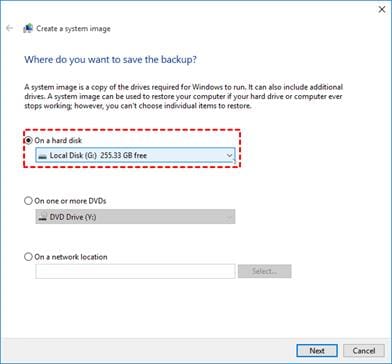
- First, choose a destination for the system image. Supported devices include hard disk, DVD, and network location. It’s recommended not to save the system image on a local drive.

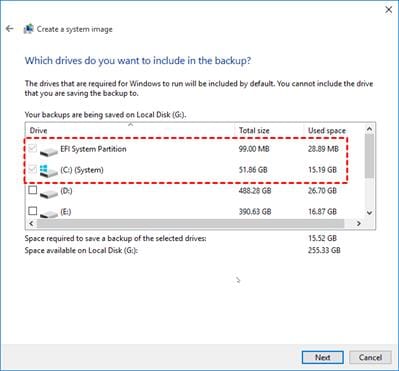
- Choose what to backup. The system-related partitions will be auto-selected. You can include additional drives as you like.

- Confirm the operation and start the backup. This may take up to hours, please wait patiently for it to complete.
When the system crashes, restart the computer into the Windows recovery environment, and choose System Image Recovery from the Advance options to restore the OS. If the computer fails to start, you can also use a recovery drive to boot it to WinRE.
This may not seem very difficult, but the whole backup and recovery process can be problematic for a variety of reasons, such as volume shadow copy service error, not enough disk space, no disk that can be used, etc. And the system image backup feature doesn’t come with schedule options to execute the task regularly.
Therefore, if you want to perform system backup & restore faster and easier, try the following alternative.
Read Also: What Are System Recovery Options in Windows
Alternative to Schedule Windows 10 System Backup
AOMEI Backupper Standard, the free backup software provides you with file backup, partition backup, system backup, and disk backup features to protect your Windows PC with very easy operation.
If you want to auto-backup the system on a regular basis, you can add a schedule like daily, weekly, and monthly; If you are worried about the accumulated backups taking up too much storage space, you can also perform incremental or differential backups to save only changed files.
As a highly compatible tool, you can use it to back up the system to an internal/external drive, USB flash drive, NAS, network share, or cloud drive. According to the 3-2-1 backup rule, keeping at least 2 copies in different storage is also recommended.
Here’s how to create a system image with AOMEI Backupper:
- Download and install the freeware from its official website, go to the “Backup” tab, and choose “System Backup”.

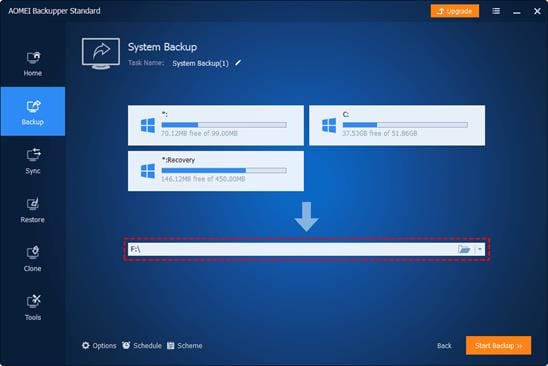
- The system partitions will be auto-detected. You just need to specify a destination to store the system image.

- If you want to backup OS automatically, click “Schedule” to configure the frequency in the “General” tab, and select the scheduled backup mode in the “Advanced” tab. Then click “Start Backup” to execute the task.

When the backup is complete, you can recover the PC any time you need. Just go to the “Restore” tab, click “Select Task” or “Select Image File” to find the system image, and follow the wizard to restore it.
In case the computer fails to boot due to system errors, you can also switch to the “Tools” tab and “Create Bootable Media” with a USB drive or CD/DVD. This allows you to boot the PC into WinPE and perform system recovery as normal.
Bottom Line
For a Windows 10 computer that is frequently used or with important data stored, it’s best to back up the system on a regular basis. Thus when the problem occurs, you can easily restore the system to a normal state and avoid unwanted data loss.
Normally you can perform system image backup with Window’s built-in Backup and Restore utility. But if you find the operation too complicated or the operation unfortunately failed, you can try AOMEI Backupper instead.


Thanks for sharing the valuable article.
Nice, it’s working good sir. Thanks for sharing with me.