
Formatting the Windows computer is many times the most common solution to get rid of many computer problems such as slowing down, hanging, not responding to errors, etc. But, sometimes we don’t prefer factory resetting the computer due to our most important files and software programs. So, in this case, the System Restore feature of Windows can be proven very helpful.
System Restore helps you restore your computer’s system files to an earlier point in time. It means if something is causing Windows to behave unpredictably, instead of just formatting the whole computer to factory level you can restore it to an earlier point in time without affecting your personal files. But, for this, you must make sure that you’ve created a System Restore Point when everything was working fine.
Below in the post, I’m firstly going to give you a brief introduction to the System Restore and Restore Points, and how you can create the restore points in Windows 7 easily.
Understanding the System Restore & Restore Points in Windows
System Restore is a feature available in Windows that lets you restore your computer’s system files to an earlier point in time.
Sometimes Windows behaves unpredictably due to the wrong installation of any drive or program. Usually, uninstalling the program or driver corrects the problem. If uninstalling doesn’t fix the problem, you can use the Windows System Restore feature to restore your computer’s system to an earlier date when everything worked correctly.
It’s the best way to undo system changes to your computer without affecting your personal files, such as e-mails, documents, or photos.
Restore Points are simply the representation of the stored state of your computer’s system files that can be restored anytime using the System Restore feature.
Restore Points are stored in the disk space reserved by System Restore and remain in the disk space until it’s filled up. As new restore points are created, the old ones are automatically deleted.
Read Also: What Are System Recovery Options in Windows
Here’s How to Create a System Restore Point in Windows 7
System Restore uses a feature called System Protection to regularly create and save restore points on your computer. You also manually create a restore point anytime on your Windows 7 computer.
Following are the simple steps to create a System Restore Point on Windows 7 computer:
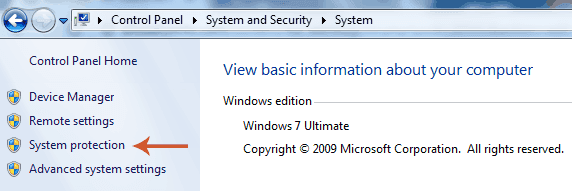
- Navigate to Start Menu > Control Panel > System & Security > System in your Windows 7 computer.
- In the left pane, click System protection. If you are prompted for an administrator password or confirmation, type the password or provide confirmation.
- Click the System Protection Tab & click Create.
- In the System Protection dialog box, type a description, and then click Create.

That’s all about manually creating a restore point in Windows 7. Finally, if you’ve created the restore point in your Windows computer, you can easily restore your system files to that restore point.
So, now you won’t need to worry about resetting computer to the factory mode instead you can just restore it to the most recent restore point you created when everything was working fine.
Must Read: How to Unlock Windows Laptop if Forgot Password
I hope this tutorial will be proven helpful. If you’re still having any issues in creating the restore point or have any questions related to system restore, feel free to ask via our comment section. Also, do share this article with your friends and followers on different social networks.


 to Use in 2024")


very nice article. this blog is very informative and helpful, Thanks for share this information.
Nice Article…
I ll try it…
Good Article. It’s helpful every one. Definitely i try this one
I’m glad you liked it Kishore.