Did you ever hear about scheduling your emails to send them later at your fixed time? So, learn here how to schedule your emails with Boomerang for the Gmail plugin. Now, first of all, you must know about the Boomerang plugin.
So, actually, Boomerang for Gmail lets you take control of when you send and receive email messages in Chrome/Firefox/Safari.
Now, take a look at what really the Boomerang is! So, continue reading the article that’s why you can understand the tip of scheduling emails very simply and efficiently.
What is Boomerang For Gmail Plugin
Boomerang for Gmail plugin is a fantastic browser extension or plugin that enables you to schedule your emails to be sent later. It means with the help of the Boomerang plugin, you can compose an email now and schedule it to be sent at the perfect time.
This Boomerang for Gmail plugin is available for Firefox, Google Chrome, and Safari. You just need to add this extension or addon to your browser and start scheduling emails to send and receive.
Features of Boomerang For Gmail Plugin
There are several awesome features delivered by this Boomerang for Gmail plugin. Some of them are the following:
- With the Boomerang for Gmail plugin, you can send an email later. You can write an email now and schedule it to be sent automatically at the perfect time.
- If you want a cleaner inbox and don’t want to lose track of important messages, then you can use Boomerang to take messages out of your inbox until you actually need them.
- Communicate with people in different time zones.
- More..
How To Install Boomerang Plugin
It’s very easy to install this plugin. Actually, you don’t need to download it instead you just need to add the extension to your web browser. So, have a look at the following steps to learn the installation guide completely.
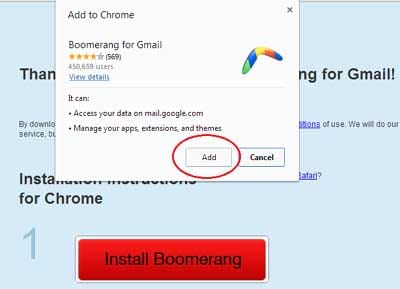
- Visit Boomerang Plugin’s Download Page and Click on Install Boomerang.
- A popup will open in front of you that will ask you to add Boomerang for Gmail extension to your web browser. Now click on Add.

- Finally, on clicking the Add button, the Boomerang plugin will be added to your browser and ask you to log in but it’s your wish to log in or not. The extension has been installed and you can use it anytime.
That’s it, friends, after installing the Boomerang for Gmail plugin, now you need to know how to schedule your mail to be sent later in Gmail.
How To Schedule Emails To Send Later
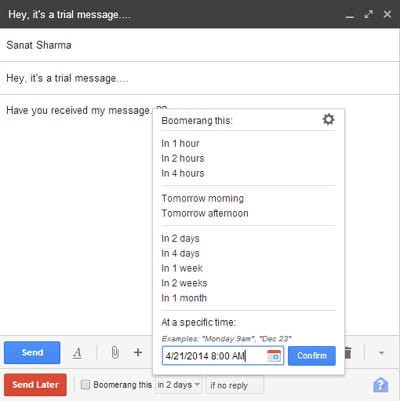
Now, I will tell you how to schedule emails to send them later on Gmail. You can write an email and set a time to send it later at a perfect time. So, see the following steps to learn how to schedule emails to send them later.
- Sign in to your Gmail account and compose a new message. Here, you’ll see a new button for Send Later. So, click on it to set the time and then click confirm.

- Now, if your browser allows pop-ups, then it’ll open a popup window and request you take permission to view and manage your emails. But, if you don’t allow popups, then you’ll have to allow them to use this service.

That’s all, as you click on Accept, the Boomerang extension will immediately schedule your message to be sent on your desired date and time. On that day and time, your scheduled message will be received by the receiver. Not only this, the Boomerang app also gives you the facility to manage your scheduled emails such as to change the time, etc. So, start scheduling emails on Gmail and have lots of fun.

![How to Schedule Messages on Telegram [Step-by-Step Guide] Schedule messages on Telegram featured image](https://allusefulinfo.com/wp-content/uploads/2023/11/schedule-messages-on-telegram-featured.png)


Boomerang features are lifesavers, but there’s a free app that does the same. It’s deskun.com. Boom boom!
Thanks for sharing about this great Boomerang alternative with us.
Boomerang is really great thing. Now I can schedule my all the mails at one time to be sent later at desired time. My favorite product ever.
Thanks a lot..I’ve successfully scheduled and sent my email in Gmail by using your article.. Boom Boom Boomerang..!
Have a good time with Boomerang!