High-quality images are crucial for any modern website. However, their large size can load the server which can slow down your website. This is more so the case for websites with a large number of images, especially photography and image-driven websites.
Besides having a hit on your performance, unoptimized images can also affect your site’s SEO as loading speed is directly related to your position on the SERP.
With all this in mind, we have put together this quick tutorial showcasing how you can effortlessly optimize your images with WP Smush, so you have faster loading times and better SEO scores.

So without further ado, let’s get started:
WP Smush Features – How Can It Optimize Your WordPress Images
WP Smush WordPress plugin introduces tons of useful bells and whistles that let you optimize your images from the comfort of your WordPress dashboard. It also comes with plenty of automation functionalities and bulk action options which helps you save time and be more productive.
Here is a quick look at all the features you get with WP Smush to help you understand how it can help you optimize your WordPress images:
Lossless Compression
The main reason why high-resolution images affect loading speeds is because of their large size. However, using lossless compression algorithms, WP Smush is able to reduce the image size without affecting the image quality.
Therefore if you run a photography blog or portfolio website where you need to showcase the quality of your images, WP Smush ensures that your image quality isn’t compromised one bit. However, by stripping off redundant data from the images that don’t influence the viewing experience, it is able to reduce image size and make your website more snappy.
Image Resizing
Apart from reducing the file size of an image, WP Smush can also help you control the actual size or dimensions of the image. You can specify the maximum width and height for the images that you want on your website. Depending on your requirements, the plugin will automatically scale down the images according to your specifications, before it is uploaded to your media library.
Powerful Smush API Integration
The plugin comes with WP Smush API which takes all your images to the main WPMU DEV servers. Therefore, all your image processing is handled by their dedicated server without taxing your resources.
This ensures that while the plugin is busy compressing your images, your server is free from any extra load and can focus on handling your traffic, ensuring uninterrupted and steady site performance.
Lazy Loader
You will also get access to a lazy loading functionality.
The users won’t see your entire webpage as soon as they visit your site. As such, with lazy loading, you can defer offscreen images to load after the main content has finished loading. Therefore, everything under the fold will load after the content above the fold has loaded – which is the first thing the user sees anyways.
This helps your site apparently improve loading speeds and deliver a snappier user experience.
Dedicated CDN
CDN or Content Delivery Network can really help you boost loading speeds, especially if you are serving your content to users far away from your physical server.
Well, WP Smush has powerful 65 TBPS servers located in over 45 locations spread across the globe. Your images are stored on the servers and delivered to your site visitors from server nearest to their location to ensure instantaneous loading times.
And Others…
And that’s not all! WP Smush offers plenty more notable functionalities which includes:
- Bulk Image Optimization or Bulk Smush.
- Incorrect Image Size Detection.
- Automatic Optimization.
- Gutenberg Block Integration.
- Amazon S3 integration.
- Support for all popular Media Library & Gallery plugins.
And much more.
WP Smush User Interface – The Image Optimization Process
Now that you have an idea of what the plugin has to offer, and what you can do with it, here is a quick how-to tutorial on using WP Smush to optimize images on WordPress for better SEO and Fast Loading.
Step 1: Installing The Plugin
First things first, installing the plugin! For this, log on to your WordPress dashboard, and from here, head on over to your left hand Sidebar > Plugins > Add New.
Now, in the search bar, type in WP Smush.
As shown in the image, you will need to install the highlighted plugin and then click on the Activate button. Once done, you should see a new option at the bottom of your left-hand sidebar from where you can access all your Smush settings and options.
Note: This is a tutorial to help you install the free version of the plugin available from the WordPress repository. If you are a member of the WPMU DEV premium membership, then you will be able to install its premium version – WP Smush Pro.
This can also be done from the free installation. Alternatively, you can download the WP Smush Pro plugin from your membership portal to your desktop in a .zip file. You will then need to upload the plugin by heading to WordPress Dashboard > Plugin > Add New > Upload Plugin, and then uploading the plugin to your WordPress installation.
Step 2: Configuring The Plugin
With the plugin activated on your WordPress website, you should see a Smush button on your backend. Click on it, and it will take you to the Smush Dashboard.
As you can see from the image above, you will get to see a quick glance view of all the images on your website optimized using the plugin, and how many bytes of storage space you saved using the plugin.
Scrolling down, you get access to the Bulk Smush option. From here, you can tell the plugin to compress any number of selected images, instead of having to do each compression one by one.
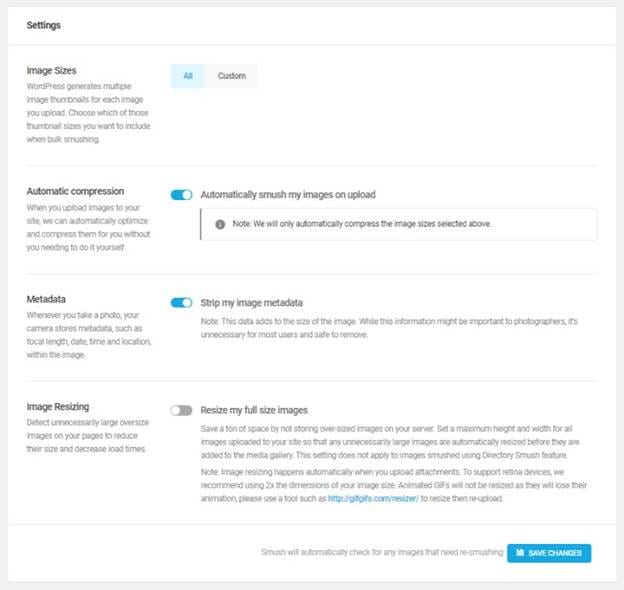
Following this, are the different WP Smush settings.
- Image Sizes – Option to choose a thumbnail size for your images after bulk smushing.
- Automatic Compression – Option to enable or disable automatic compression. This configures the plugin to automatically compress the images as soon as you upload them to your website.
- Metadata – Option to strip metadata from your photos. Each of your images that have been clicked with a camera, stores information like focal length, date, time, location, and so on. Storing this information increases image size. The plugin deletes this unnecessary information making your images lighter.
- Image Resizing – When enabled, this option allows you to set a maximum width and height for your images. Now, when you upload an image to your WordPress website, it will automatically detect if the image is over the preset limit and resize it to your configured specifications.
Once you are done with the settings and options, simply click on the Save Changes button and you are done. The plugin will now check all your images, and optimize them according to your specifications. After completion, you will also get a confirmation message that all images are smushed and up to date.
In Conclusion
We hope you found this tutorial on using WP Smush to optimize your WordPress Images to be helpful. As you can see, it offers many features and functionalities to help you improve your image SEO and improve loading speeds.


