Have you ever wanted to remove ads from any specific post or page in your WordPress blog but due to the weakness in coding you’re unable to do that? So, in that condition, the Quick Adsense WordPress plugin helps you without needing any coding knowledge. Quick Adsense is an Ads management WordPress plugin. It offers a quicker & flexible way to insert Adsense or any Ads code into a blog post. So, if you’re looking for a setup guide for Quick Adsense WordPress Plugin, then it is here!
Here I will tell you exactly how you can set up and use the Quick Adsense plugin to insert ad codes in different areas of your blog layout and how you can easily remove ads from any specific post.
So, get ready to learn this complete Quick Adsense setup guide and I hope it will be proven very useful for all the beginners to Quick Adsense WordPress Plugin.
Recommended Reading:
- How to Remove Ads from Any Specific Post in WordPress
- 3 WordPress Plugins for Better Search Engine Optimization
How to Setup and Use Quick Adsense WordPress Plugin
If you want to use Quick Adsense plugin for inserting ads in your WordPress blog, the first thing you will have to do is remove all the ads you inserted manually through coding or theme options.
After doing that, install the Quick Adsense plugin in your WordPress blog. For this, go to Plugins > Add New and search for Quick Adsense and install and activate. Or you can download Quick Adsense plugin from WordPress Plugins Repository.
Once you installed and activated the plugin, go to Settings > Quick Adsense. Here you will see several Quick Adsense Settings. So, first of all scroll down the page to Adsense Codes and paste the ad codes that you wanna see inside your post.

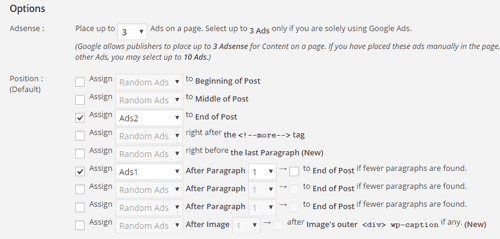
After that, you will need to select the position for your inserted ads. So, scroll the page up and assign the positions for all the ads you inserted. (See the following picture to understand it well enough)

That’s all. After doing all these things, save the changes and ads will start showing on your blog posts at your selected positions. Now, you would be thinking about how can you place ads in your blog sidebar. It’s also very easy with the Quick Adsense plugin. So, in the Quick Adsense Settings page scroll down to the bottom, and inside the boxes of Ads on the Sidebar Widget place your sidebar ad codes and save changes.

Just after doing this, go to Appearance > Widgets. Here you will see Quick Adsense Ads Widget (e.g AdsWidget1, AdsWidget2 etc.). So, drag and drop the Quick Adsense Ads Widget to the appropriate location of your sidebar. Isn’t it easy?
How to Remove Ads from Any Specific Post
Now, if you wanna remove ads from any specific post, the Quick Adsense plugin makes this task very easy. All you need to do is open that post in the WordPress text editor and navigate to Text (HTML). Here you will find several Quicktag buttons. You will need to click on the OffDef button to remove ads from that specific content. If you wanna remove ads from the sidebar for that individual post, then also click on the OffWidget button and tags will be inserted like the following.

So, I think you will find it very easy to remove ads from any specific blog post in WordPress. Moreover, I already published an article for how to remove ads from individual posts in WordPress. You can also check it out.
More for WordPress Users:
Overall, I hope you will find this tutorial very helpful for setting up and using the Quick Adsense WordPress plugin. Anything else you wanna know, feel free to ask in the comments.
UPDATE: Quick Adsense plugin is not under maintenance and development for over 3 years. You may try WP QUADS as the perfect Quick Adsense alternative.


