AdSense is one of the best and main mediums for new bloggers to start making money out of their blogs. And of course, it is the best among its alternatives. But, if you’ve set up your WordPress blog and your Adsense account is approved, now you’re required to put ad codes into your blog pages to start showing ads.
Generally, there’re many ways to put ads on your WordPress blog but in this article, I’ll be discussing only the easiest methods. So, using an AdSense code insertion WordPress plugin is one of the easiest methods to insert Google AdSense code within your post content in WordPress.
Alternatively, you may also use Adsense Auto Ads to put AdSense ads on your whole website without using any plugin.
Let’s discuss both of these methods one by one.
Insert AdSense Code in Post Content Using WordPress Plugins
Being a new blogger, it might be a bit difficult to do it manually by pasting the ad code into your theme files so I think you would prefer using a plugin to insert Adsense code within your post content in WordPress.
There’re many WordPress plugins out there for adding Adsense ads inside the content, but I chose two of the following plugins that I’ve already tested on my sites.
1. WP Simple Adsense Insertion
As the name suggests, the WP Simple Adsense Insertion plugin provides the simplest way to insert Adsense ad code within your post content.
This plugin lets you easily and quickly insert Adsense ad code to your WordPress blog’s pages and sidebar using the shortcodes. So, the very first you need to do is install and activate this WordPress plugin in your blog.
There’re two ways to install this plugin; download it from here and upload to install or install directly from your WordPress panel » Plugins » Add New » Search with Plugin name.
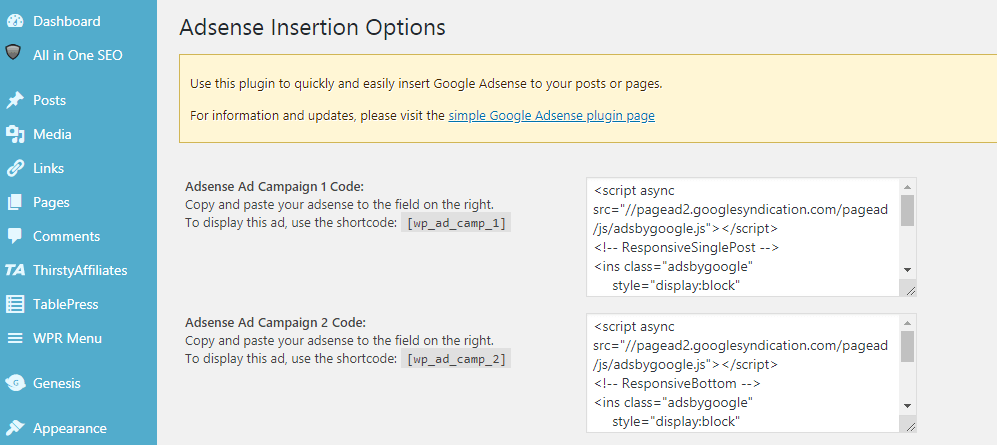
Once you’ve installed and activated the WP Simple Adsense Insertion plugin, you’re almost finished adding Adsense code to your WordPress blog wherever you want. Now, navigate to Settings » Adsense Insertion in your WordPress Panel.
Here at the Adsense Insertion page, you’ll see many text fields to paste your Adsense code. So, now login to your Adsense account, copy the ad code from there, and paste it into any of those fields on the Adsense Insertion page.
As you can see in the above picture every ad insertion box has a shortcode. So, once you’ve added the Adsense code into the field and saved changes, you can put its shortcode anywhere in your WordPress blog to display the ad; either within post content, sidebar, or anywhere you want the Adsense ad to display.
With the WP Simple Adsense Insertion WordPress plugin, you’ll have to insert the shortcodes manually within your post content, sidebars, or wherever you want to place ads. And each time you’ll create a new post, you’ll have to insert shortcodes to display ads.
But, if you want to run Adsense ads automatically on each post at desired positions, you can use the WP QUADS Adsense insertion plugin which lets you insert Adsense ads into all your blog posts automatically at once.
2. WP QUADS WordPress Plugin
WP QUADS is another great Adsense insertion WordPress plugin that lets you automatically add Adsense code into all your blog posts at your preferred positions so you won’t have to insert shortcodes every time you create a new blog post.
First of all, you need to install and activate this plugin. You can either download this plugin from the WordPress.org plugin page, upload and activate or directly navigate through Plugins > Add New > Search with plugin name, install and activate.
Once it’s installed and activated, go to WP QUADS » Ad Settings from your WordPress dashboard. At the Ad Settings page, click the ADS tab and paste your Adsense codes within Ad fields. I would recommend placing a maximum of 3 ad units per page for a better user experience. Later from the General & Position tab, you can assign them to your preferred position so that they will show at those positions in all the posts automatically.
AdSense Ads on a Whole WordPress Site Using Auto Ads
Although there are many plugins available on the WordPress Plugins Respisotery, the above-mentioned 2 plugins are my favorite ones to insert Adsense ads amazingly on your WordPress website.
But, what if you don’t even want to install any plugin to run Adsense ads on your WordPress site? There’s still a possibility. And it’s easily possible with Adsense Auto Ads.
Yes, Auto Ads work like a magic wand. All you need to turn on Auto Ads from your Adsense account and place a single piece of Ad code on your website. Rest will be done by Google Adsense itself.
Adsense will choose the appropriate positions on your website to insert ads automatically and sometimes it leads to increased revenue. So, to turn it on, log in to your Adsense account and navigate to Ads » Overview. Now, on the right side of the screen, click Edit next to your website name. Here, you can not only turn on Auto Ads but also tweak with some settings to optimize it for better performance.
After turning on Auto Ads, make sure you’ve pasted Adsense code on all the pages of your website. If you will place the Adsense code in the head section of your WordPress website, the ads will be visible on the whole website.
So, it is all about inserting Adsense ads within the post content of your WordPress blog. Both of these plugins are very helpful so if you like you can install both of these plugins to manage ads on your WordPress website.
Do share your thoughts on this article and let me know if it helped. If there’s something else you would like to know regarding Adsense insertion in WordPress, feel free to comment and ask.


