I’ve been using Freelancer.com for many days for finding freelance developers to work on my projects and liked one of its features a lot i.e. Milestone Payment.
Yes, Milestone Payment is one of the most liked features of Freelancer.com by employers and freelancers because it makes it safe to send and receive payments.
So, in this article, I’m just going to tell you what the Milestone Payment is, why it’s important, how to create and release it and other important things you need to know.
If you are a beginner to the Freelancer.com platform, you must know everything about Milestone Payment for secure and easy transactions.
What is Milestone Payment in Freelancer.com?
Freelancer.com offers a very special feature called Milestone Payment to make protected payments within the site between employer to freelancer.
The employer needs to set the Milestone Payment after awarding the project to a freelancer. This shows the employer’s willingness to pay the freelancer, which in turn encourages the freelancer to do the job well.
When a Milestone Payment is created by an employer, both the freelancer and employer can see the money but the freelancer can’t withdraw the amount until the employer releases the payment. When an employer is satisfied with the job done by the freelancer, will release the funds, and then the freelancer will be able to withdraw the amount.
Employers are advised to only release the Milestone Payment when all the assigned tasks have been accomplished and/or all deliverables have been submitted and up-to-standard.
For freelancers, a Milestone Payment can be requested before they work on projects. It’s rather reassuring to have the funds ready for when they complete the project. Also, freelancers can actually request employers to release it once they think they’ve fulfilled their commitment.
Benefits of the Milestone Payment System
There are some important benefits of the Milestone Payment system which explain why the users on Freelancer.com are encouraged to use this payment system to pay off freelancers.
- Offers protection for both users. Employers should only release the payment if they’re happy with the work done, while freelancers will be confident knowing that the payment is available and ready to be released.
- Allows the use of a Dispute Resolution System. If something goes wrong with the project, both the employer and freelancer will have access to the Dispute Resolution System. This is available as long as the Milestone Payment is still on hold and not yet released to the freelancer.
- Helps build a reputation. Both users will be able to leave feedback for one another if the project is completed and paid using the Milestone Payment System. The more positive feedback users have on their profiles, the more likely other users will work with them in future projects.
- Employers get better results. Setting up a Milestone encourages freelancers to work hard on the project, confident that they are going to get paid. Employers will find more agreeable and committed freelancers, which means they get better results out of their projects.
How to Create a Milestone Payment
Creating a Milestone Payment on freelancer.com is very easy. There are two methods to create Milestone Payment on Freelancer.com.
On Project Page:
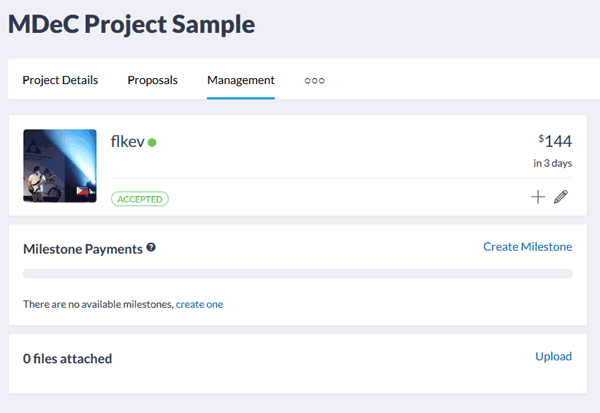
Go to your project’s page and click the “Create Milestone” button located on the right side.
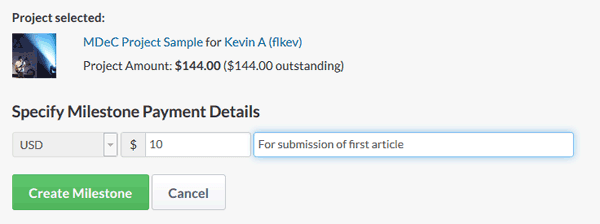
Finally, enter the details of Milestone Payment and then confirm the payment if you’ve money in your Freelancer.com account.
If you have yet to put money into your account, you will be asked to make a deposit through your preferred payment gateway: e.g. PayPal.
On Financial Dashboard:
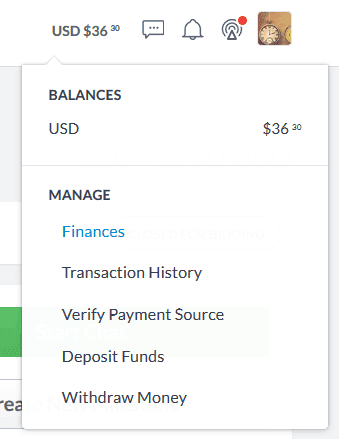
Mouse over your account balance (money in specific currency), which is located on the top right section of your homepage. Then, select “Finances”.
Now, in the Financial Dashboard click on the “Create Milestone Payment” button, enter or select the name of the project, enter the details of Milestone Payment, and finally click on the “Create Milestone” button.
How to Easily Release a Milestone Payment
However, creating a Milestone Payment is not that difficult but once upon a time, I was stuck in releasing payment to freelancers.
Actually, there are two kinds of payment choices available at Freelancer.com for employers Pay Per Hour and Pay Per Task. And the procedure of releasing Milestone is a bit different for these different payment types.
Generally, in the case of Pay Per Task releasing the Milestone is quick and simple. Just need to visit the project page and simply click on the “Release” button in front of the Milestone Payment created by you.
Or you may also release Milestone Payment from the Financial Dashboard. All you need to visit the Financial Dashboard and here you will see all your created Milestone Payments. So, by clicking on the Release button, you can simply release payments to freelancers.
But, in the case of Pay Per Hour payment type freelancer needs to send you the invoice and only after receiving the invoice from your freelancer, you can release the Milestone Payment directly from the project page.
Must Read: How to Start Earning Money With Freelancer.com
That’s all about Milestone Payment in Freelancer.com. I hope now your concept is clear about Milestone Payments. Still, if you’re having any difficulty in creating and resuming the Milestone on the Freelancer.com portal, let me know via comments or you can directly ask to Freelancer.com support representative by using their live chat option.




Many thanks for such a great explanation about the mileatone payment system in freelancer.com.
I was having problem with releasing milestone but with this post I learnt everything I actually needed to know.
Many thanks.
Glad to know your feedback, Amritelia. Keep visiting for more interesting stuffs.