It took me longer than I expected to figure this out.
I kept generating photos of my AI influencer. Different outfits, different backgrounds, different poses, and every single time, something was off. The face looked slightly different in every new generation. To anyone scrolling through my feed, it would’ve looked like I was posting photos of three different people, not one consistent character.
That’s the problem nobody really talks about when they say “just create an AI influencer.” Creating one photo is easy. Creating the same person across fifty photos and ten videos is where it gets hard.
So I spent weeks testing different tools and methods. Some free, some paid. Some worked better than I thought. Some were a complete waste of time. And eventually, I found a workflow that actually gave me what I wanted, a consistent AI influencer whose face and body look the same in every single piece of content I post.
That’s exactly what I’m sharing in this guide.
Overview
An AI influencer is a fully digital persona that posts photos and videos on Instagram or YouTube just like any real creator. The hard part isn’t making one good photo. It’s making the same face show up across every piece of content you post. AI tools don’t remember your character between generations, so the face shifts slightly each time. This is called face drift.
There are two ways to fix this. The free method uses Google Gemini or Leonardo AI to create one strong base photo, then a face swap tool to stamp that same face onto every new photo. Kling AI’s free credits handle the video side. The paid method uses tools like Higgsfield AI, where you train something called a Soul ID that permanently locks your character’s face into the system. Every photo and video after that carries the same face automatically.
What Is a Consistent AI Influencer (And Why Consistency Is The Hard Part)
An AI influencer is a digital character. A person who does not exist in real life but shows up on Instagram, TikTok, or YouTube just like any other creator. They post photos, appear in videos, promote products, and build an audience. The only difference is that everything about them is generated using AI tools. No real face. No real body. Just a digital persona that you create and control completely.
Sounds simple, right?
It is. Until you try to make that same person show up consistently in every piece of content you post.
The Face Drift Problem
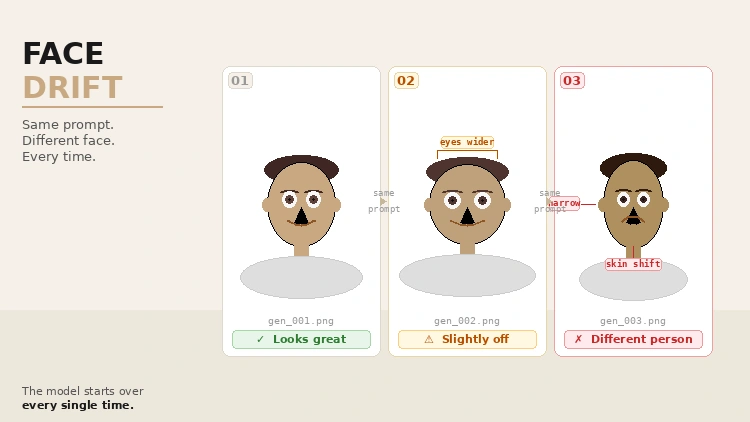
Here is what actually happens when most people try to build an AI influencer. You generate a photo. The face looks great. Then you go back and generate another photo in a different outfit or a different background, and the face is slightly off.
You do it again, and every time the face changes.
This is called face drift. And it happens because most AI image tools do not actually remember your character. Every time you hit Generate, the tool is essentially creating a new person from scratch based on your prompt. Even if you copy the exact same words, the output changes. That is just how these models work.
Why Consistency Actually Matters
Think about why you follow certain creators. A big part of it is recognition. You see their face and you already know who it is before you even read the name. That recognition builds trust. It makes people feel familiar with someone. And familiarity is what turns a casual scroller into a loyal follower.
The same logic applies to an AI influencer. If the face keeps changing, there is no character to connect with. No face to remember. No reason to follow.
Beyond followers, consistency also matters for brand deals. If a company wants to work with your AI influencer, they need to see a feed that looks cohesive. One clear visual identity. Not a collection of photos that look like they were generated by ten different people.
That is the real challenge with building an AI influencer. Not creating a good-looking photo once. But making sure that same face shows up every single time, in every photo, in every video, without you having to start from scratch each time.
That is exactly what this guide is going to help you solve.
How To Create a Consistent AI Influencer For Free
Let me be honest with you. The free route is not perfect. But it works. And when I was just starting out, it was good enough to get my AI influencer up and running on Instagram without spending a single rupee.
Here is exactly what I did.
Step 1: Generate Your AI Influencer’s First Photo
The very first thing you need is one good photo. This is going to become the master reference for everything else you create.
You can use tools like Gemini or Leonardo AI for this part. Both are free to start.
I used Google Gemini. Just go to gemini.google.com and sign in with your Google account. Once you are in, start a new chat.
Now here is where most people get it wrong. They type something like “generate a photo of a beautiful woman” and wonder why the result looks generic. You need to be very specific. Think of yourself as giving instructions to a photographer.
Here is the kind of prompt I used:
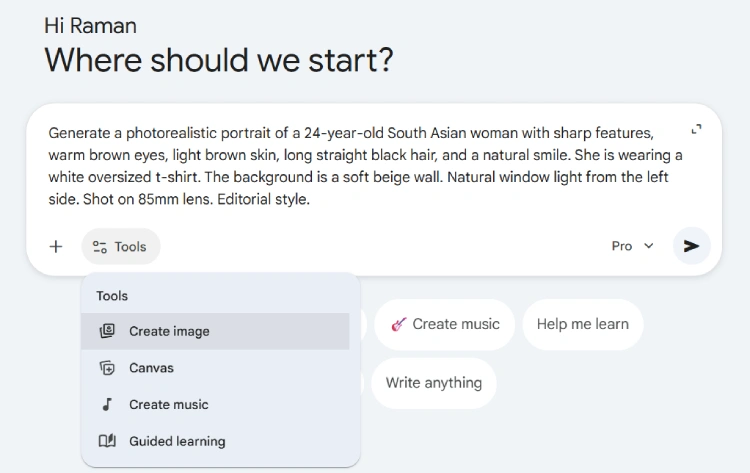
The more detail you add, the better. Mention the skin tone, the eye color, the hair, the outfit, the lighting, and even the camera style. These small details make a huge difference in the final output.
Once Gemini generates a few options, pick the one face you like the most. Save it. This is your master photo. Treat it like gold because every other photo and video you create is going to come back to this one.
If Gemini does not give you the result you want, try Leonardo AI at leonardo.ai. Sign up for a free account and you get 150 free tokens every day, which is more than enough to start.
Step 2: Use Face Swap To Make the Face Consistent Across All Photos
This is the most important step in the free workflow. And honestly, this is the step that changed everything for me.
Here is the problem. Every time you go back to Gemini or Leonardo and generate a new photo of your influencer in a different outfit or background, and even the face.
Face swap fixes this. The idea is simple. You generate any photo you want with any background, any outfit, any pose, and then you take your master photo and stamp that face onto it. Same face. Every time.
I used Lovart.ai for this. Here is exactly how it works.
Go to lovart.ai and create a free account. The free plan gives you daily credits that reset every day, so you can keep coming back without paying anything.
Once you are inside, just upload both photos; your AI character and the target photo and give it a prompt something like this:
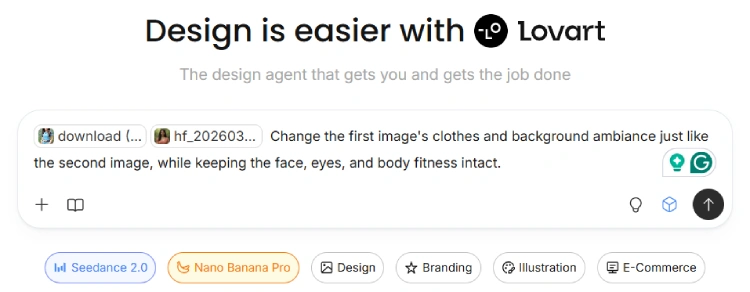
You can modify the prompt something like simply asking it to swap the face. In that case, you can generate the body and background in Gemini or Leonardo, swap in the face from your master photo, and download the final image.
Make sure the face in your master photo is clear, front-facing, and not covered by hair or sunglasses. The cleaner the reference face, the cleaner the swap.
Step 3: Create Videos Using Kling AI Free Credits
Photos are great. But video content gets significantly more reach on Instagram and TikTok right now. So, for wider success, you will need to bring your AI influencer to life.
This is where Kling AI comes in. There are many Kling AI tools available on the internet. Most of them are paid but some allows you to try their services with some free credits.
I used kling.ai/app and kie.ai. I got some free credits and they allowed me create some videos using my AI influencer photos.
The workflow is simple.
Take one or two of your final face-swapped photos from Step 2. This is going to be the starting and ending frame of your video. Go to the Image to Video section inside any Kling AI video generator. Upload your photo there.
Then write a short motion prompt. Keep it simple. Something like:
Woman smiling softly, slight head turn, hair moving gently in the breeze, natural and relaxed movement.

Hit the Generate button and wait around three to five minutes. The result will be a short video clip of your AI influencer with realistic movement.
But, the free approach is not for always. There are indeed problems with free tools, such as limited credits, slow generation speed, and sometimes inconsistent results.
How To Create a Consistent AI Influencer (Paid Method)
The free method works. But after a few weeks of manually generating photos across different tools and animating videos one by one, I was done with the process. It felt like a part-time job just to keep my feed active.
That is when I moved to Higgsfield AI. And honestly, it changed the whole workflow.
Here is exactly what I did.
Step 1: Generate Your AI Influencer’s First Photo
Before you even open Higgsfield, you need one strong starting photo of your AI influencer. This is the same Step 1 from the free method.
I used Google Gemini to generate my influencer’s first photo. You can also use Leonardo AI if Gemini does not give you the result you want. Write a detailed prompt describing the face, skin tone, hair, lighting, and outfit. Generate a few options and pick the one face you genuinely like. Save it.
This photo is going to be the base for everything else you do on Higgsfield. So take your time here and get it right before moving forward.
Step 2: Use Higgsfield’s Face Swap To Generate More Photos
Now open Higgsfield and go to the Face Swap feature.
This is where I started building my photo library. The idea is simple. You find or generate any body photo in any pose, outfit, or background you like, and then you use Higgsfield’s Face Swap to put your influencer’s face on it.
Pro Tip: I use Pinterest to find related photos for face swap.
Upload the target photo and your character’s photo from Step 1 as the face reference. Hit Generate. Higgsfield does the swap in seconds and the quality is noticeably better than free face swap tools. The skin tone blends naturally. The hairline looks clean. It does not look edited.

I did this repeatedly across different poses and backgrounds until I had a solid collection of photos. Outdoor shots, indoor shots, casual outfits, styled looks, close-ups, full body shots. The goal here is variety because you are going to need at least 20 good-quality photos before the next step.
Keep generating until you have 20 or more photos ready. The more variety in angles, lighting, and expressions, the better.
Step 3: Train the Soul ID
This is the step that changes everything.
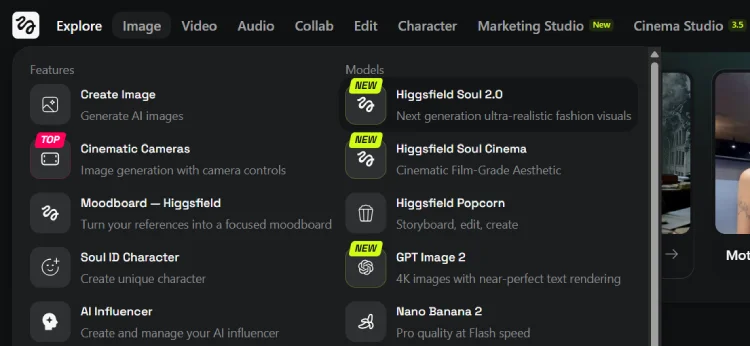
Once you have 20 or more photos of your AI influencer ready from Step 2, open the Soul ID Character tool on Higgsfield to create a Soul ID. You’ll find it under the Image tab.
Upload all those photos. Higgsfield will analyse them and build a complete digital identity of your character. The training takes about three minutes.
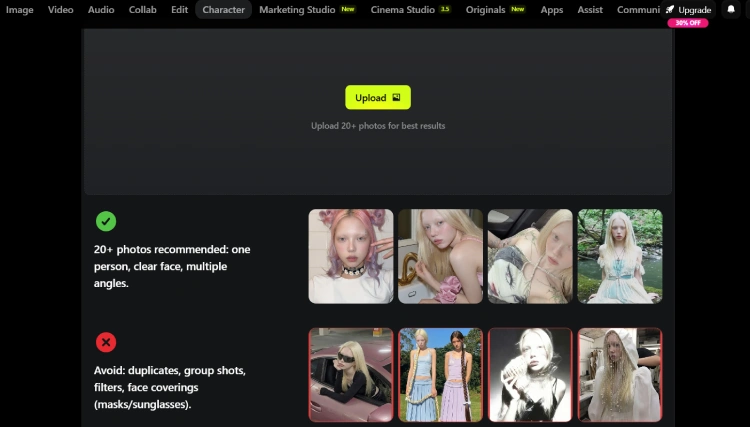
After that, your influencer’s face is permanently locked inside the system. From this point forward, every photo and video you generate on Higgsfield will show the exact same face. Same bone structure. Same eyes. Same skin. No drift at all.
This is the core difference between the free method and this one. In the free method, you are manually stamping a face onto every new photo. With Soul ID, the face is already baked into the generation. You just pick a style and generate. The consistency is automatic.
Think of Soul ID as a one-time setup. You do it once and you never have to worry about face consistency again.
Step 4: Generate Unlimited Photos Using Style Presets
With Soul ID trained, generating new photos is now extremely simple.
Go to the Higgsfield Soul 2.0 tool under the Image tab. Just choose your Character, pick a style from a list of presets like Street Photography, Underwater, etc., and give a prompt to explain your character.
Your influencer’s face appears identically in every single one, thanks to the Soul ID. If you want to generate different shots from a single photo, you can try Higgsfield’s Shots feature.
Once I had one photo I really liked, I would run it through the Shots feature. It takes one image and generates a 9-panel grid of different camera angles of the same scene. Close-up, wide shot, side angle, overhead. Nine photos from a single generation. Same face, same outfit, same lighting throughout. That single feature alone saves me hours every week.
Step 5: Create Videos Using Motion Control
Higgsfield has Kling’s video model built directly into it. So there is no separate Kling account needed. No switching tabs. Everything is inside one workspace.
Here is how I make videos now.
I take one of my Soul ID-generated photos. Then I find a short reference video online. It could be a trending dance clip, a walking video, someone laughing or talking, anything with clear and visible movement. I upload both into the Motion Control section on Higgsfield.
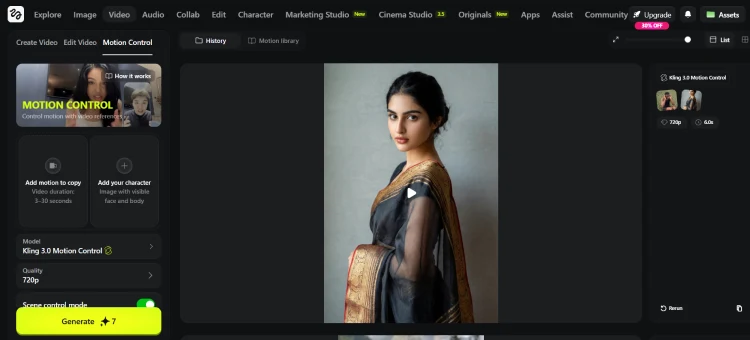
The tool reads the movement from the reference video and maps it onto my character’s photo. Same face. Same outfit. New movement. The result looks like my AI influencer actually performed that action herself. Hair moves. Facial expressions track naturally. Body follows the reference.
For Reels and TikToks, I keep the reference video under 10 seconds and the output comes out clean almost every time.
Audio works inside Higgsfield, too. With Kling 3.0 integrated into the platform, I can add native audio to the video during generation itself. My influencer can speak with automatic lip sync. No separate tool. No extra step.
Final Thoughts
Building a consistent AI influencer comes down to one thing. The same face, every time, across every photo and video you post.
The free method gets you there with more steps and more time. The paid method with Higgsfield gets you there faster and cleaner.
Start with the free route if you are testing. Move to Higgsfield when you are ready to post consistently and build something real. The space is still early. The creators starting now have the advantage.
Any questions about any step in this guide? Drop them in the comments below.


