I often have seen that many people use their laptop and PC together by connecting their laptop to the desktop monitor. Although it looks very technical thing, it’s very easy to do. In this blog post, you’ll learn how to connect your laptop to a desktop monitor.
I am going to share 6 different methods to connect a laptop to a monitor without HDMI port, with HDMI port, with VGA, or without VGA. And doesn’t matter if you don’t have any technical knowledge. You don’t need that at all; here, you will get all the essential information to get it done in seconds.
What’s Your Purpose For It?
Users connect their laptops with monitors for various purposes, like to use a laptop as a secondary display, using a laptop screen as a primary screen, making a professional setup, and many others.
However, the procedure for all purposes is the same except for some additional display settings that you must change after connecting the laptop and desktop monitor.
All the steps to change in display settings are given at the end of this post. You can follow those steps and fulfill your purpose of connecting the laptop to the monitor.
How To Connect Laptop To Desktop Monitor?
The primary method to connect laptops and monitors is with the help of cables, and unfortunately, all the existing monitors and laptops don’t have the same ports for cables.
For example, some monitors don’t have an HDMI port, and some come with an HDMI port. On the other hand, some laptops come with a VGA port, and some do not. Conclusively, we have to follow the various methods accordingly.
- Connect Laptop to Monitor with HDMI to HDMI Cable
- Connect Laptop and Monitor with VGA to VGA Cable
- Connect Laptop to Monitor with Display to Display Cable
- Connect Laptop and Monitor with Converter
- Connect Laptop and Monitor Wirelessly
- Connect the Laptop to the Monitor Using a Third-Party App
Before going further, it will be better if you check the ports in your laptop and monitor. After checking the port, you can follow any of the below methods as required. You can identify the various ports from this image.
1. Connect Your Laptop to the Monitor With HDMI Cable
If your laptop and monitor both have HDMI Ports, then you simply have to bring an HDMI to HDMI cable and plug the cable’s one side in the laptop port and the second in the monitor port. As soon as you plug the cable, the laptop and monitor will be connected. And now, you can use them as you want.
2. Connect Your Laptop to the Monitor With a VGA Cable
However, It’s very rare that a laptop and monitor both have a VGA port. But, if you are using an old laptop, it might have a VGA port. Secondly, if your monitor has a VGA port, you can use the VGA to VGA cable to connect your laptop to the monitor.
3. Connect Your Laptop to the Monitor By Display Cable
Another method to connect the laptop to the monitor is by using a Display to Display cable. It is a type of cable that provides a higher-quality display-sharing feature than all other cables, including VGA and HDMI. If your laptop or monitor (anyone) has the display cable port, you can use this cable.
4. Connect the Laptop to the Monitor With a VGA or HDMI Converter
In many cases, a laptop and a monitor don’t have to same ports like, the laptop has the HDMI port, but the monitor doesn’t have one, and vice versa. Now, you may ask how to connect the laptop to the monitor without a VGA port or HDMI port.
Here, your answer is an HDMI to VGA converter with a VGA port on one side and an HDMI cable on the other. It is easily available in the market at the cost of Rupees 150 (approx). You have to bring it and connect the VGA to VGA or HDMI to HDMI cable with it and the laptop and monitor.
Like, if your laptop has an HDMI port and the monitor doesn’t have it, you have to put the HDMI cable in the laptop and the VGA cable in the converter’s VGA port.
Maybe your laptop neither has an HDMI port nor a VGA port. Many new launching laptops are coming with types C or any other port. In this case, converters for this type C to HDMI and VGA are available. You can use them as well.
Note: Let it be very clear that the monitor you are using should not be connected to the CPU. If the CPU is connected to the monitor and both systems are working with seperate operating systems, you will not be able to connect your laptop to the Monitor using these cables. If you want to connect a laptop with a CPU-connected monitor, follow the below-mentioned methods.
5. Connect Your Laptop to Monitor Wirelessly
Most of the Windows laptops support wireless display features. You can use this feature and connect your laptop to monitor effortlessly. Notably, the second system must have a CPU and work properly in this method. Nonetheless, the detailed procedure to connect the laptop to the monitor wirelessly is given below. You can follow the steps.
Step 1. Go to the Settings on your laptop or monitor. And open System settings. A new settings page will appear here. In the side menu, open the Projecting to This PC option. On the top, you can see an option, Optional Feature. Click on this option.
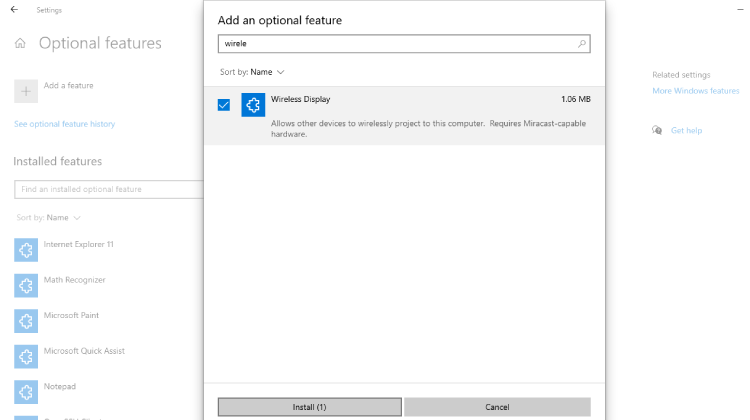
Step 2. Now, on the next screen, click on Add A Feature. Search for Wireless Display. Once found, click on the Wireless Display feature and then click on the Install button.
Step 3. As soon as the feature is installed, click on the Back button in the top left corner. Now, you can see an option to launch the Connect App to Project on this PC. Tap on this option.
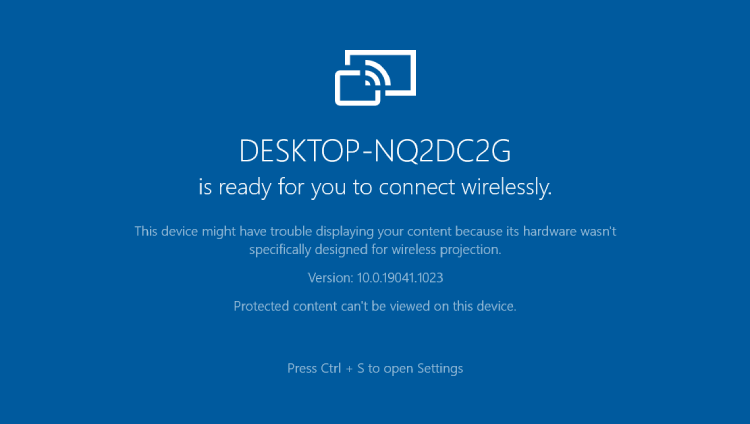
Step 4. As soon as you click on it, a new screen like the one below will appear. Leave this system here. And open another system, laptop, or PC.
Step 5. Go to Settings and open the System setting option on another system. Scroll down the newly opened page and click on the Detect button. If the system supports the projecting feature, it will list available devices. Now, you can see the device on which you launched the Connect app. Click on the device name, and it will start the projecting.
Note: Many devices don’t support the feature because of outdated older hardware. So, if you want to use this feature, both the devices you want to connect must support this feature.
6. Connect the Laptop to the Monitor Using Third Party Tool
Last but not least method to connect the laptop to the monitor using some applications and websites. Many websites allow you to do so. And the best part of these websites and applications is you don’t need to keep both systems nearby. Here are some applications and websites mentioned with steps on how you can use them to connect your laptop and monitor.
AnyDesk
It’s a software that allows users to connect two systems and operate remotely. If you are someone else and want to connect any system remotely, you just have to install the AnyDesk software in both systems and then follow the given steps.
Step 1. Open the AnyDesk application in both systems. You can see the Enter Remote Address box on the top side and then an address below. You have to enter the address of the secondary system in your primary systems’ Enter Remote Address box.
Step 2. A request will appear in the secondary system’s screen, accept that. As soon as you accept the request, both systems will be connected, and you can control the secondary system remotely.
Chrome Remote Desktop
It’s a Google application that lets users connect and control remote systems. The steps to use Chrome Remote Desktop and connect remote systems are mentioned here.
Step 1. Go to the Share My Screen page of Chrome Remote Desktop on both of your computers. Make sure you are logged in to your Google account. Here, you will see two options: Share This Screen and Connect to Another Computer.
Step 2. In the Share This Screen option, click on the Download icon. Once it’s downloaded, you will see the Accept and Install button. Click on it to complete the installation.
Step 3. After completing the installation setup, go back to the application page and tap on the Generate Code option. It will give you a code that you have to enter in the secondary system. On the application page on the secondary system, enter that code in the Access Code field, and then click on the Connect button.
This is how you have to use the Chrome Remote Desktop application and connect the remote desktop and laptop.
How to Change Settings According to Your Using Purpose?
As we discussed earlier, the purposes for connecting the laptop and monitor could be different. And settings to fulfill all those purposes are also different. Thus, only connecting the laptop and monitor is not the end. You have to make some changes to your system.
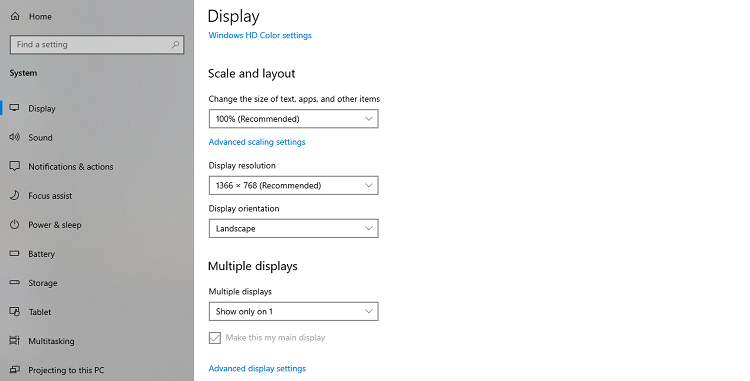
Step 1. Go to Settings and open System Settings. Make sure the Display Settings is opened. Scroll down the screen and tap on the drop-down option below the Multiple Displays.
Step 2. Now, it shows your 4 options for different purposes. Choose any one option with the help of the below-given points.
- If you want to use only one display, choose the 3rd or 4th option. Let you know the 1st screen is the laptop device’s screen, which you are using now, and the 2nd display is another one.
- To merge both displays, choose the second option, which is Extend Displays.
- If you want to see both the screen same content, choose the first option.
Verdict Thoughts
Connecting a laptop and desktop monitor is worthwhile to provide you with effortless flexibility in simultaneously working on a laptop and monitor. It allows you to work on multiple screens.
On the other hand, if your laptop’s screen is damaged, connecting the laptop to a monitor is also a good option to replace the existing one and have another screen to work.


![How To Convert Your Normal TV Into Smart TV [Complete Guide] Apple TV 4K](https://allusefulinfo.com/wp-content/uploads/2022/12/apple-tv-4k.jpg)