WordPress is a content management system that lets you manage almost all kinds of content on your blog without needing you to touch the coding part.
If you want to create a WordPress blog or website, there’s no need to have programming or coding skills. All you need to follow a very simple and basic procedure to create a WordPress blog step by step.
So, in this article, I’m going to provide a step-by-step guide to launch your first WordPress blog very easily.
The Complete Guide to Creating a WordPress Blog Step by Step
You can set up a ready-to-use WordPress blog within a few minutes if you follow the right steps. Getting a WordPress blog ready needs two things; domain name and web hosting.
And when you have a domain name and a web hosting package to host your domain, you’re very close to launching your WordPress blog. Let me guide you step by step.
Step 1. Buy a Domain & Web Hosting Package

This is the very first step for launching any website. You need to buy a domain name (such as allusefulinfo.com) and a web hosting server to host it on the web.
Most web hosting companies provide a free domain name with their hosting packages. If your hosting company isn’t offering a free domain, you can buy one from any online domain name registrar such as GoDaddy.
Once, you’ve purchased a domain name for your blog, it’s time to buy a hosting package from a reputed web hosting company.
There’re many web hosting companies available; some are good and some are extremely bad or even worst. So, it’s your first priority to choose the best one for uninterrupted service.
Here’re some of the best web hosting companies I recommend for beginners:
And as you’re just starting the blog, so it will be great if you signup for a shared plan instead of any VPS or Dedicated plan. Anytime your blog grows, you can upgrade to VPS or a Dedicated plan along with time.
Step 2. Change Nameservers At Your Domain Registrar
After purchasing the domain name and web hosting package, it’s time to change the nameservers at your domain registrar. Changing the domain nameservers simply means pointing your domain to your web host where all your website data is stored.
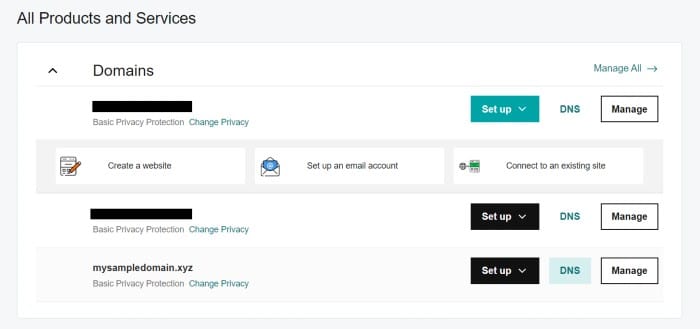
So, when your hosting package is active, you may get a mail with details of your new hosting account that includes your cPanel or FTP IP, password, nameservers, etc.
In case you didn’t get the nameservers from your host, you can ask them via their tech support or by simply leaving a mail.
Once you have the nameservers provided by your web host, log in to your domain registrar account, go to the DNS management section and replace your domain registrar’s nameservers with the ones provided by your host.
I’m not guiding you to change nameservers for any specific domain registrar because the process may be different for different domain registrars but there’s no doubt that it’s the easiest task ever. Still, if you feel a problem in changing nameservers, ask for support from your domain registrar to guide you or do it on your behalf.
So, you only need to do is copy the nameservers provided by your web host and paste them into your domain registrar. It’s that simple!
Step 3. Install WordPress
When you’ve purchased a domain and hosted it on your newly purchased web hosting package by modifying the nameservers, it’s time to install WordPress for your domain.
If your hosting package has cPanel, you can install WordPress very easily. Just need to log in to your cPanel, look for WordPress and follow the instructions. Here, you’ll generate a WordPress admin URL, username, and password to log in to your WordPress admin area.
Still, if you’re not sure what to do and what not, you can simply ask your web hosting support to install WordPress on your behalf. Most probably they will do it for you as quickly as possible.
Step 4. Setup Theme, Install Plugins & Create Post
Once you’re done with WordPress installation, log in to your WordPress admin area. Very first, you should set a good-looking theme for your WordPress blog from Appearance › Themes. By clicking on Add New button, you can search for thousands of free WordPress themes to choose the one for you.
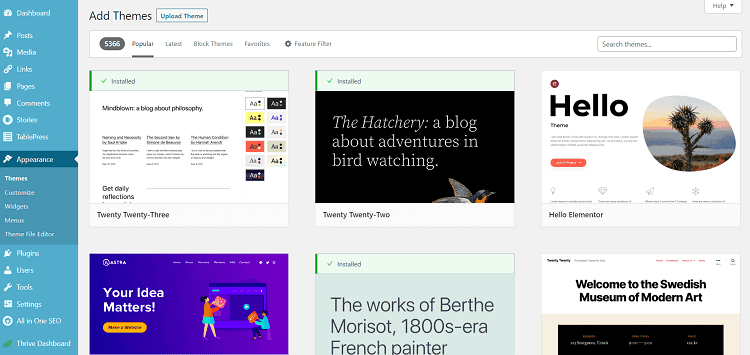
In case you don’t like any, there’re many other places on the web that lets you download free themes for WordPress blogs such as MyThemeShop, aThemes, and more.
After setting up a theme, you need to install some must-have WordPress plugins to give a good start to your blog such as:
- SEO plugin – I recommend the All In One SEO Pack to beginners.
- Contact Forms plugin – I recommend Contact Form 7.
- Social Media Sharing plugin – There’re many free plugins available.
- Sitemap plugin – Your SEO plugin comes with this feature, so you don’t need an additional plugin for it.
- WordPress Security plugin – Wordfence Security or Loginizer.
- Cache Plugin – WP Super Cache or WP Rocket (Premium plugin).
These are some of the must-have WordPress plugins that you should install on your blog. And now when everything is up-to-date, you’re ready to create your first blog post. Go to Posts › Add New and start writing something awesome.
However, it’s all about launching your first WordPress blog, and following these steps, one by one will surely help you get your blog ready within a few minutes but, in order to get traffic from Google searches and track the visitors on your site, you’re required to add it to Google Search Console & Google Analytics respectively.
